Skinner Front Sight Calculator
When changing to the excellent Skinner apeture sights, quite often a new, higher, front sight is required to be able to adjust the sights to a normal point of aim. This occurs because the Skinner sights are slightly higher than most factory open sights. Since all shooters see over or through open or peep sights slightly differently, and there are slight differences in individual guns, preferred loads and points of aim, it is difficult to predict exactly the height of the new front sight. The standard advice is best - install the new rear sight, shoot the gun and see if a new sight is necessary. There is, however, another method to determine the height of the front sight that relies on a sighted-in gun and careful measurements of the old sights.
Use the calculator below to find the height of the new front sight when changing to a new rear sight, using measurements from your old front and rear sights. Using this method may eliminate some guesswork in determining whether your existing front sight will work with your new rear sight, or help to choose the correct front sight to match up with your new rear sight.
In order to use the method below, you'll start by making some measurements on the rifle on which you are replacing a rear sight. You must start with a set of sights that you have adjusted for some particular load. You cannot simply measure the sights as they came from the factory since they may have simply been installed on the rifle and may not have been adjusted to any particular point of aim.
Many people aim over open sights differently than they aim through peep sights. Even open and peep sights that co-witness (the center of the aperture of the peep site aligned with the top of the open and front sights) will often result in different points of impact on paper. Allow yourself some room within the adjustments of your new sight to get on target.
With all that in mind, let´s get started.
1. Measuring your current sights
We will need to calculate the height of both the front and rear sights above the centerline (C/L) of the rifle bore. Two ways of determining these distances are illustrated here. Either measure from the bottom of the barrel to the top of the sight (H) and subtract half the width of the barrel (B) at that point (Method 1), or measure the height of the sight from the top of the barrel (S) and add half the width of the barrel (B) at that point (Method 2).
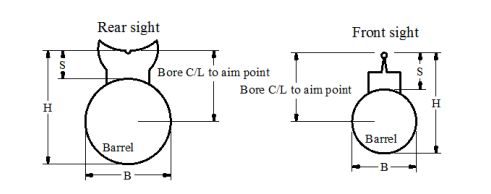
The critical dimension we need is the distance from the bore C/L to the aim point of the sight. Measuring B and H (Method 1), this dimension is
Bore C/L to aim point = H - B/2
and measuring B and S (Method 2) the dimension is
Bore C/L to aim point = S + B/2
If you have access to the underside of the barrel, measuring H (Method 1) is easier and more precise than measuring S (Method 2). Method 1 automatically takes into account the height of any ramps and adjusters which get in the way when measuring S. Method 1 is usually easy to carry out with the front sight, however you may have to remove the forearm to be able to measure H on the rear sight.
Measure B and S (or H) as carefully as you can, for example using the vernier, dial or digital calipers you use to measure the overall length of your reloaded cartridges. If you don't have access to calipers, you can still successfully make these measurements with a machinist scale or ruler with graduations down to 1/32" if you are careful and precise.
The height of the old rear sight is the more critical of the two measurements. If you are off by 1/32" in the height of the rear sight in the example below, you´ll be off target by about 6" with the new front sight. However, making a 1/32" error with the front sight puts the new point of impact off by only about 2" with the new sight configuration. Measure as precisely as you can.
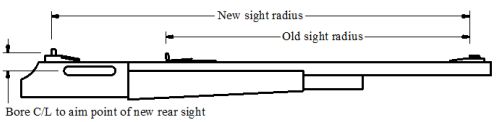
Example: The measurements below were taken from a typical .45-70 Marlin 1895 SS, factory sights adjusted for the 405-gr JSP Remington factory load.
Old configuration:
Sight radius = 17.5"New configuration:
Rear sight: S = 0.448", B = 0.940"
Front sight: H = 1.172", B = 0.755", bottom of dovetail to top of sight = 0.300"
Sight radius = 24.5"
Rear sight: Bore C/L to center of aperture of the Skinner 1895/336/336 XMR = 0.5" (bore C/L to top of receiver) + 0.480" (receiver to center of aperture, minimum) = 0.980". With the aperture adjusted 2 turns up adds another 0.050", for a total of about 1.030"
Rear sight measurements:
Front sight measurements:
2. Determine the recommended height of the front sight
With these measurements, we can now determine the recommended height of the front sight to work with the new rear sight. Enter the sight radius for the old and new sight configurations, along with any other data that you did not enter or calculate above:
Old sight configuration:
New sight configuration:
New front sight: